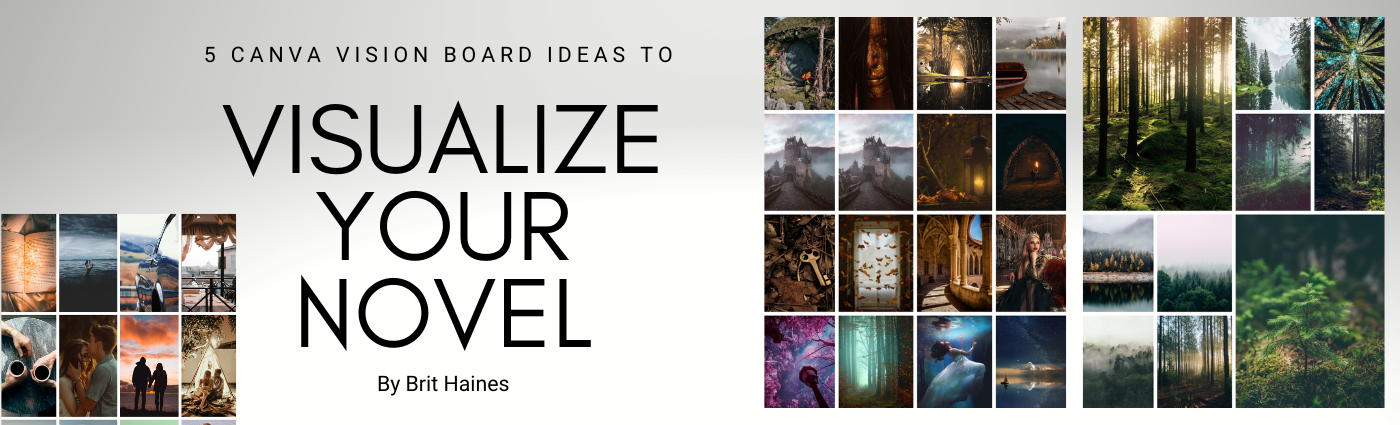
5 Canva Vision Board Ideas to Visualize Your Novel
Disclosure: My blog contains affiliate links, which means I may receive a small commission on qualifying purchases. Although, I only link to high-quality writing-related companies and products. Whether or not you buy is entirely up to you. I’d recommend them either way.
Are you stuck planning your novel or writing the perfect ending? Vision boards are an unusual and extremely beneficial resource for writers. Both new and experienced writers use these boards to achieve their goals.
In this post, I'll show you how to make a vision board using Canva and explain why my five vision board ideas allow you to better visualize your novel. Each comes with vision board examples. There's also a board for every story, no matter your current writing stage.
How to Use Canva to Make Visual Aids for Your Novel
Canva is an excellent online tool to create visual aids for your novel. Although novels deal in written words, visuals are the best way to help you free-associate ideas and stay motivated as you write.
A vision board allows writers to:
- Brainstorm: In the very beginning, you might not yet have a clear path for your story. Visuals benefit the planning process.
- Plot outline: Some novelists outline the direction of the story somewhere so they can refer back to it as they write. You could plan the characters, setting, plot, etc.
- Develop characters: Imagine what your main and secondary characters look like, including their mannerisms, personality, and speech patterns.
- Storyline: Visuals for your storyline could include scenery for each chapter as the story develops. Or, you could summarize each chapter with a message or quote to motivate you.
- Create compelling endings: Instead of writing out alternate endings, visualize multiple endings with vision boards. The inspiration you gain is great for deciding on endings or plot twists.
Step 1: Sign Up for Canva
If you haven't heard of Canva, go ahead and signup. The free plan works well for our needs. Use my referral link to get credits for discounts on Canva's premium features.
Step 2: Collect Images
Collect photos for your vision board. Use Pinterest, Google Images, or free stock photography sites like Unsplash, Pixabay, StockSnap.io, or PicJumbo.
Don't worry about getting too specific. Choose imagery that makes sense to you. You can also include inspirational prompts, quotes, or images of your favorite authors.
I like to start by making a Pinterest board and pinning the images for my story there. Then, I save the folder on my computer.
Save your images in a file on your desktop or Dropbox to make them easy to find later.
Step 3: Start a New Canva Vision Board
Head to Canva. Click on "create a new design" and select the US letter document option. A vertical design should open, which you can switch to horizontal if you prefer.
Next, upload your previously saved file of images to Canva. Click on "folders" along the left sidebar, then drag and drop your file. The image batch should import and look the same as your saved file.
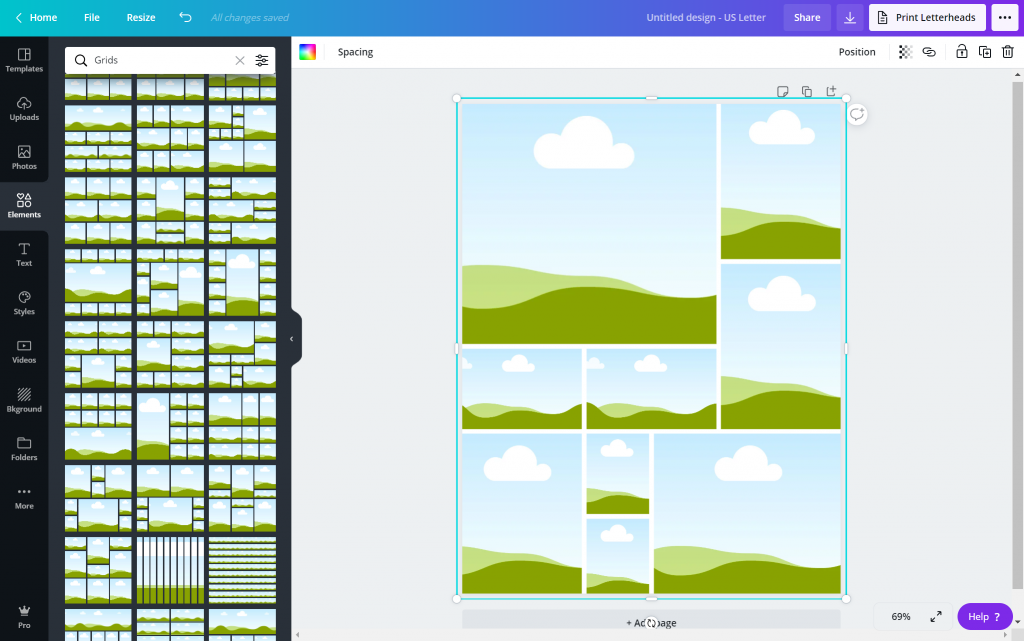
Step 4: Make Your Grid
Choose the grid you would like based on the appearance and number of images you have to use. Click "elements" in the left toolbar > Grids > See all.
Select the grid layout you like the best. Now you can drag each image onto the vision board.
Step 5: Hang Your Vision Board
Once your vision board is complete, you can save the file in multiple formats.
Set it as your desktop or phone background, print the board to hang from a corkboard, or frame the image to keep all your vision boards in one place. Put your vision somewhere you will see it daily.
1. The Brainstorm Session Vision Board
The planning process is the first step to writing any type of novel, short story, or poem. A brainstorm vision board is a free-for-all. You can include any images that fit your story. The goal of this board is to inspire scenes and plot ideas.
In the example below, I use tree imagery to set the scene for a magical forest (the main setting for a fiction story I was working on last year).
2. The Plot Development Vision Board
If you already have an idea of your story's direction, the next step is to outline. Visualize each scene and choose images to show the story progression. Imagery could include characters, setting, or plotline.
Another option is to make a vision board for each chapter, setting, or character separately (more on character development vision boards next).
My example below shows how a story I worked on for a client earlier this year transitions, with a progression of backgrounds based on the scenery development of a fictional world.
3. The Character Development Vision Board
A separate vision board dedicated to character development is ideal for main characters. However, you could create boards for your secondary characters as well.
Dedicating a board to characters allows you to imagine elements such as appearance, fashion choices, career paths, personality, speech patterns, and so much more. What type of house does each character live in? What do they look like? The process allows writers to mold believable characters - even if they're based on real life people.
Below is a character development vision board for the heroine in my current work-in-progress.
4. The Storyline Outline Vision Board
Storylines are tricky to visualize. Like a storyboard, you can use a vision board to imagine the structure of your story.
Start by splitting up your story into chapters, scenes, or smaller sections. Find an image to highlight each section and continue driving the story forward.
This type of vision board allows you to quickly and easily go through your plot and storyline. You'll see the narrative in your mind and find plot holes before they cause problems.
I show how I used a vision board to spot plot holes in the image below.
5. The Alternate Ending Vision Board
Stuck trying to find the perfect ending?
Outline the ending options you're trying to decide between and find images to summarize each. You might focus on the main message or the emotions each ending conjures. Watch the story unfold through the images in your vision board, then pick the best possible ending.
A board like this is also beneficial for finding the right plot twist, as I did in the vision board example below for a thriller novel I worked on.
The Key is to Use Vision Boards to Your Benefit
Make sure the images you select for your vision board(s) resonate with you. Take your time to consider each image or quote. Look at your vision board when you need your synapses to fire. You might notice the visual helps ideas form in your mind, or the dream board could help you stay motivated to finish writing the story.
Which vision board example is your favorite? Let me know which vision board idea benefits you the most in the comments below.